

TEXTILE CONVEYOR BELT SPLICING
MULTIPLY TEXTILE CONVEYOR BELT SPLICING - STEP BY STEP
Equipment hints
Length of the press: at least 150 mm longer than splice edges
Width of the press: at least 60 mm wider than belt on both sides
Length of work table: double splice length
Transitions between belt cover and fill: 45° bevel
Grinding machine: max. 1600 rpm
Grain: 30 - 60
Thickness of uncured splice: 2 mm thicker than the belt
Thickness of edge irons: 1 mm less than belt thickness
Press pressure: min. 10 bar

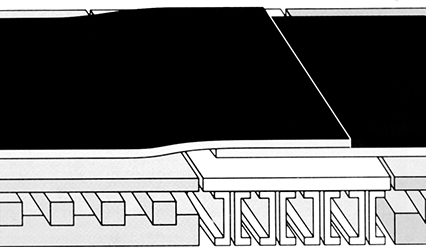
Both partial lengths will be put one on top of the other along the whole splice length. The lower part of the portable heating press is used as a working table.
For positioning the bottom platens of the press both belt ends will be folded back.
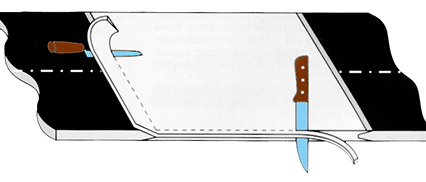
The splice length will be transferred to the combined rubber sheeting, and the splice edge will be placed to the lower splice edge of the second belt end.
In accordance with the rectangular datum line it will be checked parallel and diagonal whether the alignment is correct. If not, it will be readjusted.
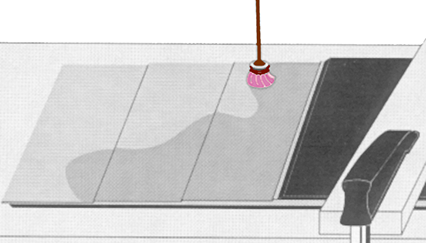
Combined rubber sheeting will be tapped with a mallet.
Cut with a knife at a 30° angle down to the fabric
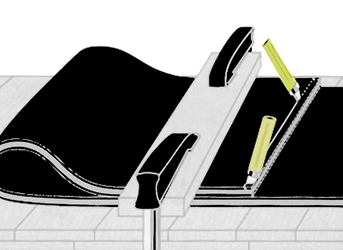
The rubber covers both of carrying and running sides of both belt ends will be removed ("stripped off").
In the rubber cover on the carrying side along the inner splice line marking, cut with a knife held at a 30° angle until it gets down to the fabric.
The rubber edge of the belt will be removed.
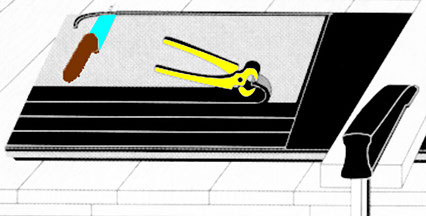
For stripping the rubber cover, continuous strokes with a special knife with grip tongues are used.
The rubber will be removed down to the fabric. Tearing it off is not permitted.
For cutting the plies a special ply knife is used. This knife prevents damage to the ply underneath.
Splice edges of the carrying and pulley side of both belt ends will be roughened with a wire brush.
The textile plies are coated with rubber solution by means of a brush or a spatula.
Let dry well!
An unvulcanized rubber sheet will be put on the fabric.
To avoid air inclusions a hand-roller is used.
The alignment of both belt ends is controlled by means of a string across the three marked center dots.
A chalk line will be marked and rubber edges will be trimmed off.
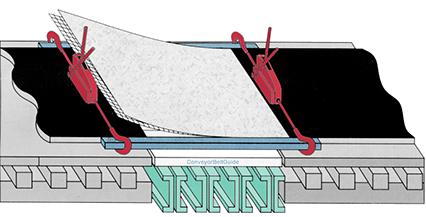
Between the lower heating platen and the bottom rubber cover, cloth is placed across the whole splice area.
Edge bars will be placed at both sides of the belt and fastened with edge clamps outside the splice area.
The edge bars will be approximately 1-2 mm thinner than the belt itself.

The upper plates are placed and aligned.
The upper traverses will be placed in a way that both end traverses are positioned outside the splice area.
The end locking bolts are positioned and tightened slightly.
The oil pumps are connected to the upper traverses.
The end bolts are tightened thoroughly.
The electrical cables are connected to the heating platens.
A pressure of ~10 bar is applied with oil pump.
The heating platens are plugged in.
The pressure is increased as temperature rises. Temperatures at all heating plates to be controlled.
The temperature is adjusted by switching energy on and off. After several minutes allow temperature to rise to 142° C. The curing time counts when temperature reaches 142 ° C.
Disconnect at 145° C!
Plug in again when temperature drops to 142°C!
The curing time is determined according to belt thickness, i.e. 2,5 minutes per mm of belt thickness.
After the curing time has elapsed, the platens are allowed to cool down to 60° C.
The traverses and end bolts will be loosened and removed.
The upper heating platens are removed.
The edge clamps are loosened and the edge bars are removed.
The spliced belt is lifted and the lower heating platens are removed.
The working platform is removed.
Rubber overflow at both edges is trimmed off.
The belt surface, the ramps and the edges are inspected visually.
The belt can be put into service.
START-UP
Before start-up, the conveyor should be inspected for construction materials, tools or structural components which could gouge or cut the belt as it begins to move.
The belt should be run empty and slowly first and then accelerated up to the normal operating velocity.
A new conveyor belt may need a couple of weeks to run absolutely smoothly on the conveyor structure - like a pair of new leather shoes.
In case of mistracking or other problems kindly refer to the First Aid page.